
DIYRC's
"Foamy Factory 3DX"
Airplane
|
|
DIYRC's |
|
UPDATED: JUNE 05, 2004
CLICK HERE TO CHECK OUT DIYRC's NEW VIDEO !
Here's a little info on Tom's latest project, the 3DX electric airplane, designed by Tim Hart of www.FoamyFactory.com
Free Airplane Plans | Pictures | Videos | Links
(Pictures shown below are listed chronologically)

Owens/Corning Fan-Fold Foam used... purchased at Home Depot for $32 + tax (25
sheets)

Initial cutout of wing, fuselage and stabilizers (used band saw w/ fine blade)

Marking of lines for carbon fiber tube cutouts, wing and stab slots, servos,
etc...

The band saw method was so easy, I had to attempt cutting multiple patterns,
stacking 4 sheets of foam. EASY!

Initial setup, just to see what it's going to look like.... pretty neat!... eh?

another view...

Close up of motor and where it mounts.... This is a GWS 350C gearbox/motor combo
(6.6:1 ratio, "D" setup).


Ok now... it's time to fit the carbon fiber 4mm hollow tubes in to the wing
and fuselage...
Jars/Cans were used as weights, holding down the tubes into the cutouts (wax
paper used) while the 30 minute epoxy dries

Close-up of the split elevator. I opted to use a pc. of leftover CF tubing,
joining the two halves.

Another close-up of the elevator details. The elevator will then pivot
(hinge) around this tube.

OK! All epoxied and... READY FOR PAINTING !!!

After $15 worth of Testors spray paint (WalMart), this is what I came out with.
I made spray paint templates from leftover foam, and hand-drawn the U-Can-Do
3D-looking design/scheme onto the foam and cut out with a razor.


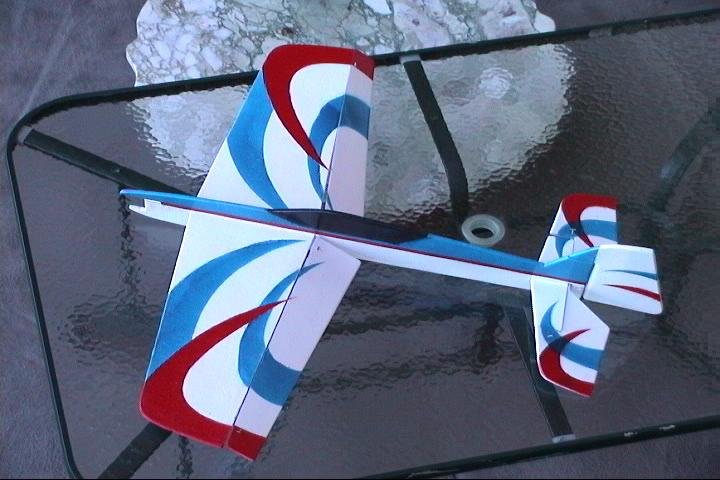


Picture above is that of the Great Planes U-Can-Do 3D ARF airplane... the inspiration for the paint scheme.

I decided to use a rod through the elevator CF tube such that it acts as the
control horn. The rudder control horn is made from a scrap pc. of nylon,
attached with 5min. epoxy.


The HS-55 servos are simply installed by cutting out the slots in the foam,
applying masking tape to the outside of the servo (for protection) and then
gluing them in the foam with poly glue.

Another view of the servos (Elevator/Rudder) controls... I used Dubro EZ
connectors and some small wire I had left over from another project.

Two different 1200mAh 3-cell Li-Poly packs I plan to test... One is Kokam (left) and the other is E-Tec (I made this one from bare cells).

The small GWS servos I used for each aileron. See the specs?.... Only 5.4 grams! 10oz of torque should be enough.

Mounting of the aileron servos. I made some custom servo brackets out of thin ply and embedded them in the foam. Servos were then attached.

What's this you ask?!?! This is my modified GWS 4 channel receiver. I hacked it such to get an extra channel out of it (Soon to be a next webpage project) and then fabricated & attached lead-out wires to connect to the various servos (vice using heavy servo extensions). The only access to the receiver is a cut out in the shrink-wrap to plug in the motor controller (BEC) jack.

Layout of the aileron servos and wires. Wires are then covered with thin
1mil tape.

To stop flexing of the control rods, I used cut-off popsicle sticks with a hole
drilled through them.

Most of the wiring is camouflaged with 1 mil white tape.

Here's the brunt of the electronics... from left to right.... The modified GWS
receiver, a spare Zagi 20 amp ESC/BEC, the Kokam 1200mAh Li-Poly pack and a
stock GWS 350C geared motor system (6.6:1 ratio). It flew great with this
system BTW!

Another close-up of the elevator and rudder servo controls....


The aileron servos plug into a custom connector attached to the receiver...
eliminating servo extensions!

READY FOR ITS FIRST TEST !!

Experimental landing gear I had fun designing and bending... I probably will not use.

How it would attached,.. if I even decide to use it.

Here's the first pic of my Razor 350 brushless motor and Phoenix 25 amp
controller mounted in the foamy.

and yet another pic but a little closer...

The 1100mAh, 3 cell LiPo pack I built... If you are not good with electronics and/or soldering, don't attempt to build your own... be safe and buy them already made... REALLY!


The foamy weighing in at 13 oz (no battery)

The foamy with the 1200mAh 3-cell Kokam pack... (under a pound!)

The foamy with the large 1600mAh LiPo pack I built (3s2p cells)... still not too bad.

My lightest pack... the Kokam 1200mAh 3-cell pack... Just might not be enough with my brushless system... that's why I built the 1600mAh pack.

The 3-cell 1200mAh E-Tec LiPo pack I built came out a little heavier than the
Kokam pack, mostly due to the extra circuit board I used to connect the cells
together... easier to fabricate with these connectorized circuit boards... safer
too!

And finally, the 6 cell (3 series, 2 parallel or 3s2p) LiPo pack I built.
This pack has been tested and it is probably the best match for the foamy with a
brushless. Smaller packs will probably not be able to supply the current
often required by brushless motors...

A few labels I made and applied... have to give credit where it is deserved. Thanks again to Tim Hart (www.foamyfactory.com) for the free design!


... more to come ...