| Modifications
for the MS-12 and MS-13 Occupancy Sensor/Motion Detector |
Updated: 12/06/03
Heat Shrink Tubing trick | Defeating
Dusk/Dawn | Adding Dusk/Dawn Adjustment
Mod for Door/Window Sensing |
Mod
for 'Supervision" Monitoring | Defeating the 6 minute
IR Timer
WARNING: Performing these
modifications are done at your own risk. I will not be held liable
for any issues that arise from performing such modifications.
 What's
all this MS12/13 "Occupancy Sensor" Stuff?
What's
all this MS12/13 "Occupancy Sensor" Stuff?
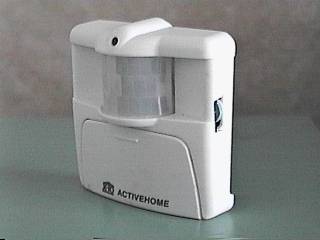
The MS12 and MS13 are quite sophisticated little devices.
Not only are they a motion detector, they are also a dawn/dusk sensor too!
The MS12 is the original occupancy sensor first developed by X-10 but after
amazingly listening to the end-users (i.e.,... myself included!), they
decided to implement a few user programmable features such as dusk/dawn
Enable/Disable and user selectable delay (the delay in time the unit will
send an OFF command once it is triggered by motion). The passive IR motion detector sends a pre selected Unit ON command (via RF) when motion
is detected and then an OFF command when no motion has been detected.
In the case of the MS12, this delay time is fixed at approximately 6 minutes.
This same delay time is user programmable in the case of the MS-13 (programmable
in increments of minutes). The second sensor, the Dusk/Dawn sensor, sends
an X-10 ON command (+1 unit code of pre selected house code for motion
sensor) when darkness is detected and an OFF command when light is detected.
As for the MS13s, the dusk sensor feature can be disabled such that the motion
sensor send X-10 signals regardless of the state of the dusk/dawn sensor.
One weird thing which X-10 had originally decided to do (in MS-12
design only) was to integrate the two sensors such that the passive IR
sensor only communicates (transmits RF) when the Dusk/Dawn sensor is detecting
darkness. Hmmmmm........ If only there was a switch or control for this
such that the two sensors can operate independently! Also, there should
also be an adjustment for the Dusk/Dawn sensor. X-10 amazingly listened
to end users and promptly redesigned the MS-12 with useable enhancements,
as in the case of the release of the newer, revised MS-13 Occupancy sensor.
The following modifications will work with both the MS-12 and MS-13 units.
The major difference between the two models in the incorporation of an
additional Green LED and a reprogrammed PIC controller.
There are three ways to alter these dang Dusk/Dawn sensors. One
modification is to completely remove the Dusk/Dawn sensor capability! There
are two methods to accomplish this. The easiest and simplest way is to
remove
power to the Dusk/Dawn circuitry. Another variant to removing the Dusk/Dawn
feature is to completely cover the CDS cell with heat shrink
tubing by placing a long enough piece over the CDS cell which will
fake the MS12 out in thinking that it is always dark. (Believe me, the
snipping of the jumper is the easiest!!) The last modification is to add
a Dusk/Dawn sensitivity adjustment. This required a small change to
the circuit such that R8 (68K) is removed and a mini 150K (or so) ohm potentiometer
is inserted in its place. This mod would allow for Dusk/Dawn sensitivity
adjustment. This mod (granted not as easy as the previous) would require
you to also make a small mod to the enclosure such that the potentiometer
sticks out of the case (just a lil') so that you can simply adjust it with
your finger. (Click on the picture above to view an enlargement of my modified
MS12 with Dusk/Dawn sensitivity adjustment!)
Using Heat Shrink tubing to trick the MS12/13
Dusk/Dawn Sensor
Open the battery compartment and remove the two (2) AAA batteries. Remove
the 4 screws on the back 4 corners and separate the top and bottom halves
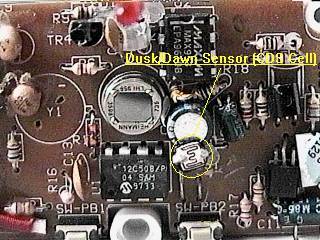
of the enclosure. Toward the center of the circuit board you will see 2
sensors. The motion sensor is the round "can-like" object in the middle
of the circuit board with a square glass-like window. The Dusk/Dawn sensor
is located just down and to the right of this (a
glass bead with a squiggly line). Obtain a 1 inch piece of heat shrink
tubing large enough in diameter to cover the CDS cell. Carefully heat the
tubing until it fully shrinks around the sensor then quickly (while the
tubing is still hot) pinch the top just above the actual CDS sensor with
pliers. It is very important to seal the light out completely. Put it all
back together and test to be sure it is operating properly.
Defeating the Dusk/Dawn sensing circuitry
(You can refer to the MS-12/13
schematic for this modification)
Open the battery compartment and remove the two (2) AAA batteries.
Remove the 4 screws on the back 4 corners and separate the top and bottom
halves of the enclosure. Toward the center of the circuit board you will
see 2 sensors. The motion sensor is the round "can-like" object in the
middle of the circuit board with a square glass-like window. The Dusk/Dawn
sensor (CDS1) is located just down and to the right of this (a
2-leaded glass bead with a squiggly line). Now, locate the wired jumper
(D1, it is 3/8" long) just above the CDS1 sensor. To completely disable
the MS-12A Dusk/Dawn sensor you must snip
the jumper and be certain that the jumper is open. You can slightly
bend one piece of it up so they will not touch. Put it all back together
and test to be sure it is operating properly.
Believe it or not, but with this mod (totally
eliminating CDS1 dusk/dawn circuitry), I have noticed an increase in motion
detection range. I'm also predicting a little longer battery life too!
Actually, removal of the CDS cell (by snipping off completely) and resistor
R14 (100K) will completely disable the dusk/dawn circuitry,... where as
it will not draw any unnecessary current.
Without either of these two mods, you would have to code/program each
MS12 such that they are separated by two unit codes (due to the fact that
the Dusk/Dawn sensor uses the +1 unit code of motion sensor). Now, when
the Dusk/Dawn sensor is disabled, you can then code them closer together,
not worrying about the "+1 unit code" problems!
Adding a Dusk/Dawn Sensitivity Adjustment
(You can refer to the MS-12/13
schematic for this modification)
Open the battery compartment and remove the two (2) AAA batteries.
Remove the 4 screws on the back 4 corners and separate the top and bottom
halves of the enclosure. Toward the center of the circuit board you will
see 2 sensors. The motion sensor is the round "can-like" object in the
middle of the circuit board with a square glass-like window. The Dusk/Dawn
sensor (CDS1) is located just down and to the right of this (a
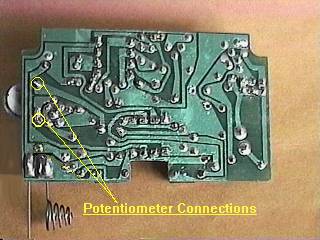
glass bead with a squiggly line). Now, to the far right of the CDS1
sensor, locate resistor R8 (68K) and carefully remove it from the circuit
board. Obtain a mini 150K potentiometer and solder
it in its place. (you might have to bend the potentiometer's leads
a bit to make it fit). The enclosure (top and bottom shells) will have
to be customized (exacto-blade or Dremel) to allow
for the potentiometer body and dial. Make sure that the potentiometer daily
extends past the body of the enclosure such that you can easily adjust
it with your finger. Set the potentiometer to its middle position (roughly
75K) and test to be sure it is operating properly. If all works fine, reassemble
and try fooling around with the adjustment to fit your need.
Modifying the MS-12 to be a Door/Window Sensor
(You can refer to the MS-12/13
schematic for this modification)
Open the battery compartment and remove the two (2) AAA batteries. Remove
the 4 screws on the back 4 corners and separate the top and bottom halves
of the enclosure.
There are many variants to adding a reed switch to the MS-12A. The first
is to connect the reed switch such that when the reed switch is open (magnet
not nearby), the MS-12A will transmit an X-10 ON signal, and will send
an X-10 OFF when the reed switch is closed (magnet nearby). Another variant
would be just the opposite, X-10 OFF when closed, X-10 ON when open. There
are also other variants where you can have both the Dusk/Dawn and IR motion
sensors operate totally independently. There is also another variant which
would allow you to either totally eliminate either the Dawn/Dusk or IR
motion sensor capabilities. I'll try to focus on all these variants separately.
And finally, I received a few emails regarding other methods of modifying
the occupancy sensors and decided to include them here also. Although
some of these mods have not yet been verified by myself, I still figured
I'd include them here in case others wanted to attempt them.
MOD FOR X-10 OFF WHEN REED
SWITCH IS OPENED, X-10 ON WHEN CLOSED!
The first step is to locate the Jumper (D1)
which
will be snipped. After cutting the jumper with snippers,
be certain that the two separate halves of the jumper
are separated, not touching each other or anything. The next step is
to add a new 10K resistor and reed switch. This
new 10K ohm resistor is soldered to left half of remaining jumper The
Magnetic
Reed Switch leads are then soldered to the MS-12A (one to other side of
resistor, the other to GND) You must then notch
a small slot on the lower half of the enclosure to allow for the reed switch
wire to exit. Put it all back together and test to be sure it is operating
properly.
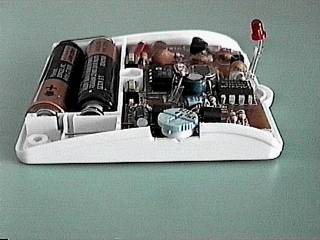
Your completed/modified MS-12A / Door/Window
RF Sensor should resemble this picture.
MOD FOR X-10 ON WHEN REED SWITCH
IS OPENED, X-10 OFF WHEN CLOSED!
The first step is to locate the Jumper (D1)
which
will be snipped. After cutting the jumper with snippers,
be certain that the two separate halves of the jumper
are separated, not touching each other or anything. The next step is
to add a new 10K resistor, a new 1Meg resistor and a reed switch. The two
resistor are tied together in series and connect across the left side of
the snipped D1 jumper and GND. One side of the reed
switch is then connected to the junction of these two resistors and the
other side connected to +3V.
(TO BE CONTINUED SOON!)
MOD FOR INDEPENDENT OPERATION
OF DUSK/DAWN AND IR MOTION SENSORS
The first step is to locate the Jumper (D1)
which
will be snipped. After cutting the jumper with snippers,
be certain that the two separate halves of the jumper
are separated, not touching each other or anything.
(TO BE CONTINUED SOON!)

ANOTHER SIMPLE MOD TO CONVERT UNITS TO DOOR/WINDOWS
SENSORS
I have received a few emails describing another simple method to convert
these units into door/window sensors, similar to the mod functionality
described above. Although I have not actually tested this mod, I
figured I'd still include it and maybe when some one out there reads this
and successfully attempts this mod, they can inform me of such.
This alternative method is quick and simple. You can simple cut
off the CDS cell (leaving long leads, snipping leads toward the top of
the CDS cell) and then, across these two now-separate leads, solder the
contacts from the reed switch (or any other contact closure switch).
This mod simple replaced the CDS (cadmium sulfide) photo-resistive cell
with a simple contact closure. Below is a copy of one of those email,
just in case you wanted to contact the author.
Hello Tom!
Just finished reading the modification for X10 ON when
switch open and X10 OFF when switch closed. This is more easily
implemented by replacing the CDS1 sensor with the
reed switch and a 1K resistor in series. When the switch is closed,
simulates a DAWN condition. When the switch is open,
simulates a DUSK condition.
Jean-Claude Chagnon
Domotique-Residentiel.Com
Thanks for everyone's comments and suggestions.
(TO BE CONTINUED SOON!)
Adding a 'Supervision' feature to the Door/Window
Mod.
(You can refer to the MS-12A
schematic for this modification)
(TO BE CONTINUED SOON!)
Modification to Defeat the 6 minute IR timer
(Thank goodness for the MS-13s as they now
have a user-settable timeouts!)
(You can refer to the MS-12A
schematic for this modification)
NOTE:
Unfortunately, there seems to not be an easy solution. The 6 minute
timer is actually a function managed internally by the PIC code; no components
will alter the delay (dangit!). There are ways though to "swap" sensors
such that the IR Motion sensor could drive the MS-12a PIC's Dusk/Dawn input.
This input does not have an associated "lockout" time delay as is the case
with the PIC's Motion sensor input. Hmmm.. you'd think that swapping
sensors would then work! Well, I have tried this (I believe someone
else did something similar) but had problems with delays in RF triggering.
I have noticed that there could be up to around a 9 second delay between
the time the motion sensor detected
motion and the time the MS-12a transmits RF. Weird!??!?!?!?
Haven't figured this one out yet. The PICs input (originally designed
for the dusk/dawn sensor) seems to inherent a "scan" period for sensor measurement. Still working though.... as time permits!
You can be sure that I'll post to the newsgroup if I make any progress
(TO BE CONTINUED SOON!)
Earthmen
Productions
©1996-2004
 What's
all this MS12/13 "Occupancy Sensor" Stuff?
What's
all this MS12/13 "Occupancy Sensor" Stuff?
